City Map Route Extraction
 View on GitHub
 Digital Humanities class, 2018.
Full project description can be found on the Digital Humanities Website
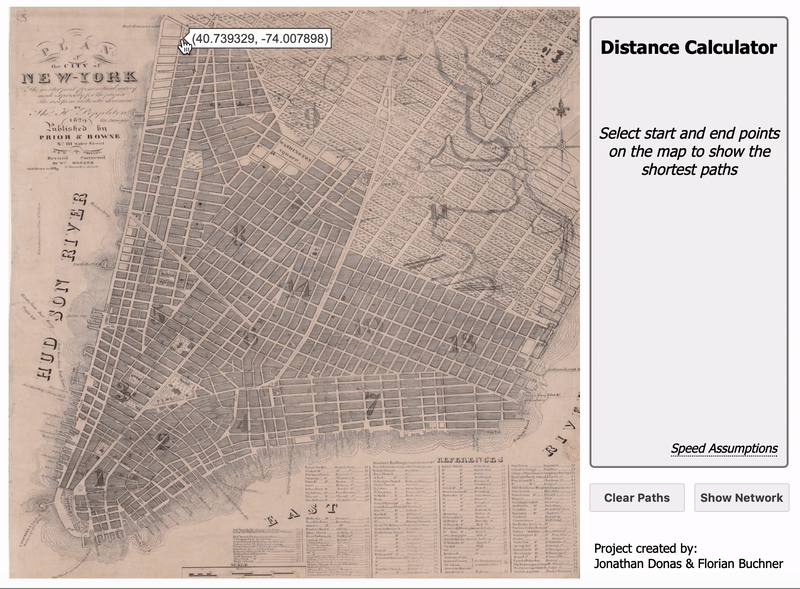
The idea of this project is to give people a glimpse of what it was like to navigate through Manhattan in the past, specifically in 1829, at a time when New York City was experiencing rapid growth. To accomplish this, we built a direction-finding tool which was inspired by Google Maps and similar services. This tool allows a user to find the shortest path between start and end points selected on a map. It also computes estimated travel times and takes into account both the layout of the city as it was at the time, and the modes of transportation available at the time.
This gives the interested user the chance to appreciate how navigation was different two centuries ago from what it is like now and to explore how both routes and travel times have evolved.
The Historical Document
We worked on a historical map of Manhattan, depicting mostly Lower Manhattan as well as some part to the north-east side. The following is a compilation of some contextual information retrieved directly from within the map:
- Self-designated as “Plan of the City of New-York”
- Published in 1829
- In the English language
- Source material of the map states: “The greater part from actual survey made expressly for the purpose (the rest from authentic documents)”
- By Thomas H. Pappleton, City Surveyor
- Published by Prior & Bowne
- Revised and corrected by William Hooker
The map features a clear visual distinction between two sections. The first one, delimited to the north-east by North Street, Bowery, Eighth Street, Greenwich Lane, and Great Kill Road, is characterized by buildings drawn shaded-in. This is in contrast to the other section, where buildings are drawn more lightly. Places that are superimposed over roads are drawn in a dashed style. The former section depicts parts of the city that are already built, while the latter represents parts that are unfinished or only at a planning stage. While this interpretation is natural, it is not evident beyond doubt from the map itself (which lacks a legend) what the meaning of the different shadings of the buildings is. However, another map from around the same time (1836), allowed us to draw this conclusion. This other map contains a broadly similar division, as well as a legend revealing the darker areas as “section(s) of city built” and the lighter ones as either “opened or being regulated” or “established by ordinance”.
For the project, only the darker section on the map, corresponding to already built parts of the city, is used - the rest is ignored.
Graph Extraction
For the proposed application, the relevant information that needs to be extracted from the map is a usable representation of the road network. For this, the Python tool NEFI, developed at “Max Planck Institut für Informatik”, is used. The tool performs automated detection of networks in images based on the Guo-Hall thinning algorithm and outputs the extracted network as an undirected planar graph, stored in a text file. Intersections are the nodes of the graph in this representation, while roads are edges. Besides the fundamental graph extraction step, the tool also provides functionality for some basic image preprocessing before graph extraction, as well as some options for post-processing the extracted graph.
However, simply running NEFI on the map image, as it is, is not enough to get satisfactory graph extraction results. In fact, for the application at hand, nothing less than an optimal graph is acceptable since a graph where edges and nodes do not accurately coincide with roads and intersections will be either unsuitable for direction-finding or at least visually displeasing when overlaying computed routes onto the map image. A desirable workflow for the whole graph extraction process might look like this:
- Crop the image, remove from the outset portions of the image that are irrelevant (in this case: margins, sea, sections corresponding to parts of the city not yet built), basic image preprocessing (e.g. enhance contrast, blur). While the latter could be achieved using NEFI’s inbuilt preprocessing capabilities, these are fairly limited, so using an external program is likely advisable.
- Automated graph extraction using NEFI.
- Visually assessing and, as required, manually correcting inaccuracies in the graph extracted from the map. For this task, ideally, we would need a GUI tool that provides the possibility to overlay the graph onto the original map and, directly in this view, permit manual editing of nodes and their connections in accordance with the underlying image.
Unfortunately, no such convenient way of correcting errors in the extracted graphs by means of a graphical editor was found. This leaves us with no option for correcting graph errors but editing directly the text file in some way, which is highly impractical. As a result, the preprocessing and cleaning of the image before graph extraction becomes all the more important. To get decent results, we had to resort to rather heavy preprocessing, manually segmenting the image into roads and inaccessible areas (i.e., coloring them black and white, respectively) using GIMP. Graph extraction using NEFI is then run on the manually segmented image. The pipeline that was specified in NEFI consists of the following ordered steps:
- “Watershed DE Otsus” from category ‘‘Segmentation’’, short for “Watershed with Dilation, Erosion and Otsu’s Threshold”. Default settings are used.
- “Guo Hall Thinning” from category ‘‘Thinning’’. This algorithm does not have any settings.
- “Guo Hall Graph Detection” from category ‘‘Graph Detection’’. This algorithm does not have any settings.
- “Keep only LCC” from category ‘‘Graph Filtering’’. This removes all but the longest connected components from the graph obtained. This algorithm does not have any settings.
We realize this approach is far from ideal, and not very efficient, since the manual segmentation in the preprocessing step actually amounts to (implicitly) doing a big part of the graph extraction by hand, but the indirect route via NEFI still has to be taken for the actual graph extraction. We nonetheless decided to stick to that approach, since it works in principle, and spending more time searching for a user-friendly tool for manual extraction and editing of graphs based on images was deemed not worthwhile. However, for future similar projects, it might be advisable to invest some time in researching, or even creating, such a tool. Having such a tool at one’s disposal, one could perform manual graph extraction conveniently: forgoing the indirect route via NEFI entirely. Alternatively, you could cut down on the necessary preprocessing before the automated graph extraction via NEFI, since there would now be a feasible way of correcting errors afterwards.
Additionally, the manual segmentation during the preprocessing inevitably introduces some human-input-related ambiguity. However, this is not inherently different from the ambiguity that would arise in direct manual graph extraction or the ambiguity involved with assessing the accuracy of an extracted graph. Some degree of ambiguity of this type therefore seems unavoidable.
Relating to Real-World Coordinates and Distances
The output we get from NEFI is a planar representation of the road network, where the coordinates of nodes correspond to pixel coordinates in the image from which the graph was extracted. A priori, this is not meaningful. To make those coordinates meaningful, we needed to link them to real-world coordinates and distances.
We briefly explored the idea of using georeferencing by means of the software QGIS to help us with this. However, we could not find any information on the reference ellipsoid and projection system used in the historical map, which is information required for geo-referencing. Additionally, we encountered what we believe is a bug in QGIS (but might also be merely incorrect usage) where raster maps above a certain size (pixel number, not file size) are not displayed correctly in the program. We therefore abandoned this idea.
Instead, we decided to approximately solve these problems by assuming a linear transformation between graph and real-world coordinates (i.e. disregarding all curvature effects) and explicitly working out by ourselves the conversion factors involved. The first step in this process is to find three reference intersections, that are clearly identifiable both on the historical map and on a modern map. For these three reference intersections, the coordinates of the corresponding nodes on the graph, and their real-world latitude and longitude (read manually from Google Maps) are registered.
Website Implementation
We created a website to showcase our project. The website contains the NEFI text file that contains node and edge coordinates and is outputted during graph extraction. From here, everything is dynamically generated in the browser using Javascript. There are three main components that work towards displaying the final product:
- Graph Parsing: We start by iterating through each line of the NEFI output file. This allows us to construct an edge-list and node-list representation of our graph. These edge and node lists are later used to build an interactive graph object. We also store a list of paths, which is a combination of nodes and edges together. This path list allows us to compute shortest paths later.
- Shortest-Path Routing: We use Dijsktra’s Algorithm to determine shortest routes between intersections. We wrote a custom implementation of the algorithm that runs in the browser whenever a user creates a new route. We decided to compute the paths in the browser (rather then precompute and send the information to the user in a file) in the interest of fast load times for the user. Dijkstra’s algorithm runs quite fast and has a minimal performance impact in the browser. We also compute the travel times for pedestrians and horses in parallel with Dijkstra.
- Interactive Graph Drawing: We use Plotly to display an interactive map to the user. At its core, the map overlays an invisible planar graph onto the image of the old map. We found that we needed to do light manipulation of the dimensions of the planar graph to perfectly align it with the map image.